网站建设盐城最便宜廊坊网站开发公司
第6章 构建 RESTful 服务
6.1 RESTful 简介
6.2 构建 RESTful 应用接口
6.3 使用 Swagger 生成 Web API 文档
6.4 实战:实现 Web API 版本控制
6.3 使用 Swagger 生成 Web API 文档
高质量的 API 文档在系统开发的过程中非常重要。本节介绍什么是 Swagger, 如何在 Spring Boot 项目中集成 Swagger 构建 RESTful API 文档,以及为 Swagger 配置 Token 等通用参数。
6.3.1 什么是 Swagger
Swagger 是一个规范和完整的框架,用于生成、描述、调用和可视化 RESTful 风格的 Web 服务,是非常流行的 API 表达工具。
普通的API文档存在的问题:
- 由于接口众多,并且细节复杂(需要考虑不同的 HTTP 请求类型、HTTP 头部信息、HTTP 请求内容等),创建这样一份高质量的文档是一件非常繁琐的工作。
- 随着需求的不断变化,接口文档必须同步修改,就很容易出现文档和业务不一致的情况。
为了解决这些问题,Swagger 应运而生,它能够自动生成完善的 RESTful API 文档,并根据后台代码的修改同步更新。这样既可以减少维护接口文档的工作量,又能将说明内容集成到实现代码中,让维护文档和修改代码合为一体,实现代码逻辑与说明文档的同步更新。另外,Swagger 也提供了完整的测试页面来测试 API,让 API 测试变得轻松、简单。
6.3.2 使用 Swagger 生成 Web API 文档
1、配置 Swagger 的依赖。
在pom.xml 文件中引入 Swagger 相关依赖包:springfox-swagger2、springfox-swagger-ui。如下:
pom.xml
<!--Swagger2 依赖配置--><dependency><groupId>io.springfox</groupId><artifactId>springfox-swagger2</artifactId><version>2.8.0</version></dependency><dependency><groupId>io.springfox</groupId><artifactId>springfox-swagger-ui</artifactId><version>2.5.0</version></dependency>
2、创建 Swagger2 配置类。
Swagger2Config.java
package com.example.restfulproject.comm.config;import org.springframework.context.annotation.Bean;
import org.springframework.context.annotation.Configuration;
import org.springframework.web.servlet.config.annotation.ResourceHandlerRegistry;
import org.springframework.web.servlet.config.annotation.WebMvcConfigurer;
import springfox.documentation.builders.ApiInfoBuilder;
import springfox.documentation.builders.PathSelectors;
import springfox.documentation.builders.RequestHandlerSelectors;
import springfox.documentation.service.ApiInfo;
import springfox.documentation.spi.DocumentationType;
import springfox.documentation.spring.web.plugins.Docket;
import springfox.documentation.swagger2.annotations.EnableSwagger2;/*** Swagger2 配置类*/
@Configuration
@EnableSwagger2
public class Swagger2Config implements WebMvcConfigurer {@Beanpublic Docket createRestApi() {return new Docket(DocumentationType.SWAGGER_2).apiInfo(apiInfo()).select().apis(RequestHandlerSelectors.basePackage("com.example.restfulproject")).paths(PathSelectors.any()).build();}private ApiInfo apiInfo() {return new ApiInfoBuilder().title("Spring Boot 中使用 Swagger2 构建 RESTful APIs").description("Spring Boot 相关文章请关注:https://blog.csdn.net/shipley_leo").termsOfServiceUrl("https://blog.csdn.net/shipley_leo").contact("shipley_leo").version("1.0").build();}@Overridepublic void addResourceHandlers(ResourceHandlerRegistry registry) {registry.addResourceHandler("swagger-ui.html").addResourceLocations("classpath:/META-INF/resources/");registry.addResourceHandler("/webjars/**").addResourceLocations("classpath:/META-INF/resources/webjars/");}
}
在上面的示例中,我们在 SwaggerConfig 的类上添加了@Configuration和@EnableSwagger2两个注解。
- @Configuration 注解让 Spring Boot 来加载该类配置。
- @EnableSwagger2 注解启用 Swagger2,通过配置一个 Docket Bean,来配置映射路径和要扫描的接口所在的位置。
- apiInfo() 方法主要配置 Swagger2 文档网站的信息,比如网站的标题、网站的描述、使用的协议等。
3、添加文档说明内容。
SwaggerController.java
package com.example.restfulproject.controller;import com.example.restfulproject.comm.utils.JSONResult;
import com.example.restfulproject.model.User;
import io.swagger.annotations.Api;
import io.swagger.annotations.ApiImplicitParam;
import io.swagger.annotations.ApiOperation;
import org.springframework.web.bind.annotation.*;/*** 使用 Swagger 生成 Web API 文档*/
@Api(tags = {"用户接口"})
@RestController
@RequestMapping(value = "/swagger")
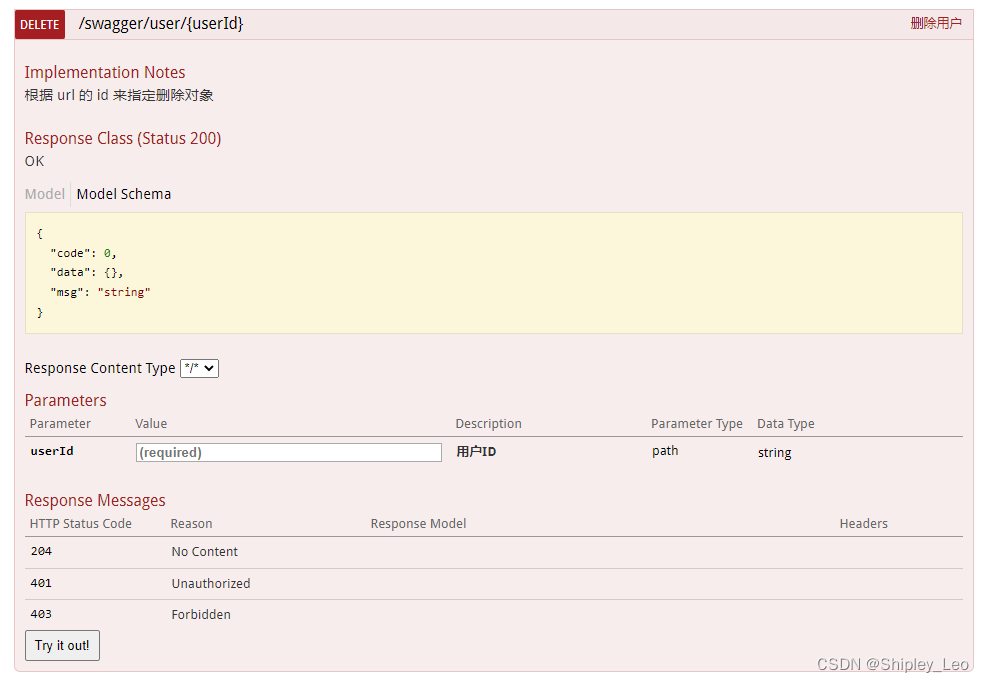
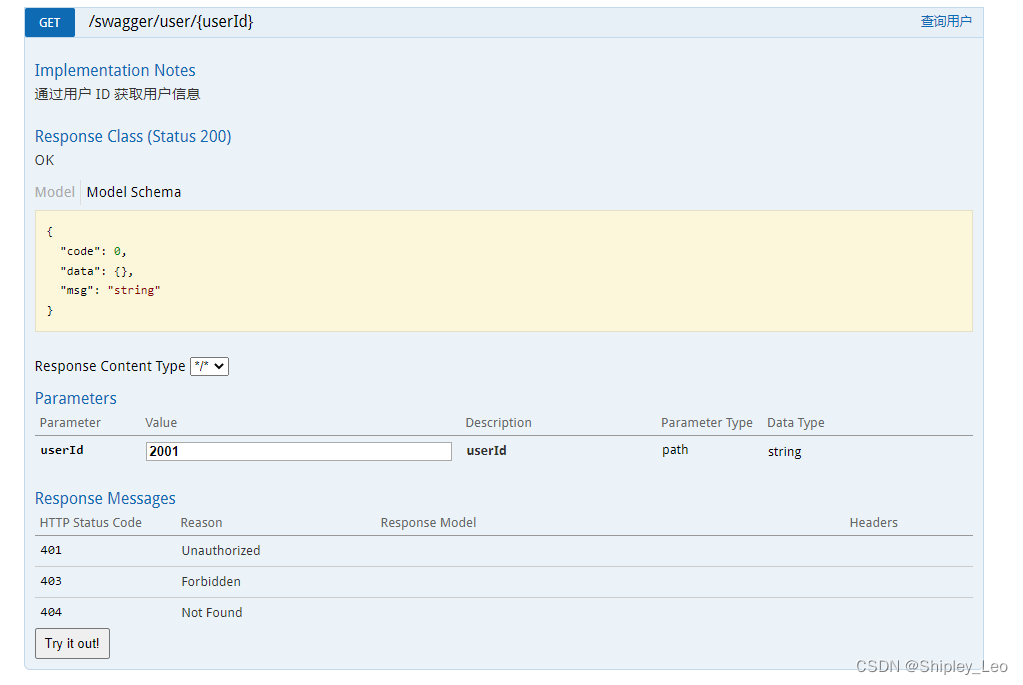
public class SwaggerController {@ApiOperation(value = "创建用户", notes = "根据 User 对象创建用户")@PostMapping(value = "/user")public JSONResult save(@RequestBody User user) {System.out.println("用户创建成功:" + user.getName());return JSONResult.ok(201, "用户创建成功");}@ApiOperation(value = "更新用户详细信息", notes = "根据 id 来指定更新对象,并根据传过来的 user 信息来更新用户详细信息")@PutMapping(value = "/user")public JSONResult update(@RequestBody User user) {System.out.println("用户修改成功:" + user.getName());return JSONResult.ok(203, "用户修改成功");}@ApiOperation(value = "删除用户", notes = "根据 url 的 id 来指定删除对象")@ApiImplicitParam(name = "userId", value = "用户ID", required = true, dataType = "String", paramType = "path")@DeleteMapping(value = "/user/{userId}")public JSONResult delete(@PathVariable String userId) {System.out.println("用户删除成功:" + userId);return JSONResult.ok(204, "用户删除成功");}@ApiOperation(value = "查询用户", notes = "通过用户 ID 获取用户信息")@ApiImplicitParam(name = "userId", value = "用户ID", required = true, dataType = "String", paramType = "path")@GetMapping(value = "/user/{userId}")public JSONResult queryUserById(@PathVariable String userId) {User user = new User();user.setId(userId);user.setName("zhangsan");user.setAge(20);System.out.println("获取用户成功:" + userId);return JSONResult.ok(200, "获取用户成功", user);}}在上面的示例中,主要为 SwaggerController 中的接口增加了接口信息描述,包括接口的用途,请求参数说明等。
- @Api 注解:用来给整个控制器(Controller)增加说明。
- @ApiOperation 注解:用来给各个 API 方法增加说明。
- @ApiImplicitParams、@ApiImplicitParam 注解:用来给参数增加说明。
4、查看生成的 API 文档。
(1)查看生成的 API 文档
完成上面的配置和代码修改之后,Swagger2 就集成到 Spring Boot 项目中了。接下来启动项目,在浏览器中访问 http://localhost:8080/swagger-ui.html, Swagger 会自动构建接口说明文档,如图所示。
swagger-ui.html(Swagger-UI 启动页面):
用户接口:
创建用户:
更新用户详细信息:
删除用户:
查询用户:
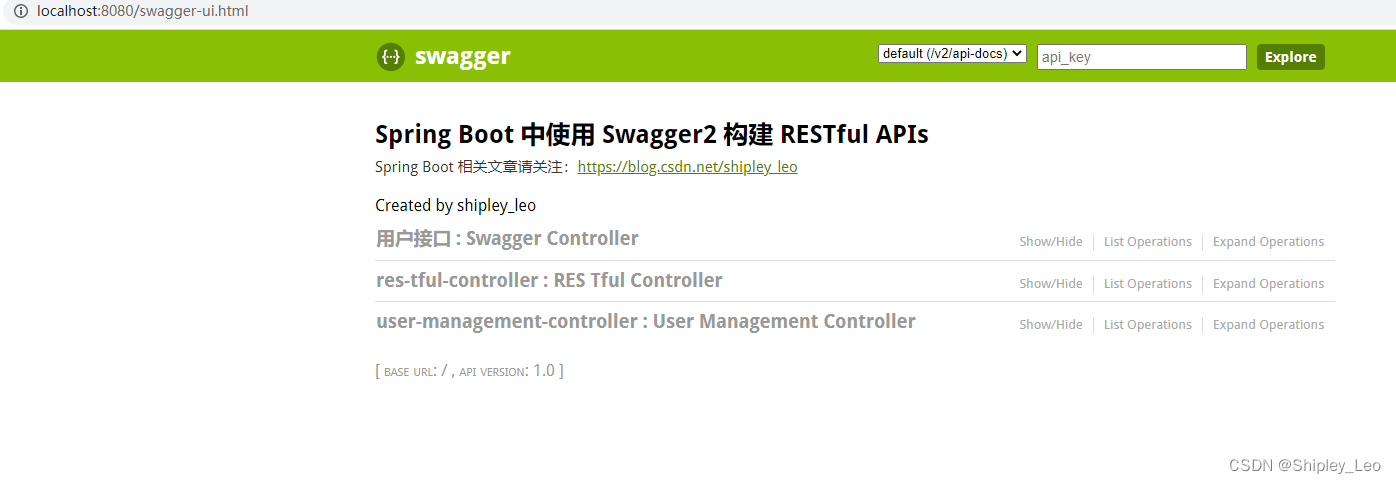
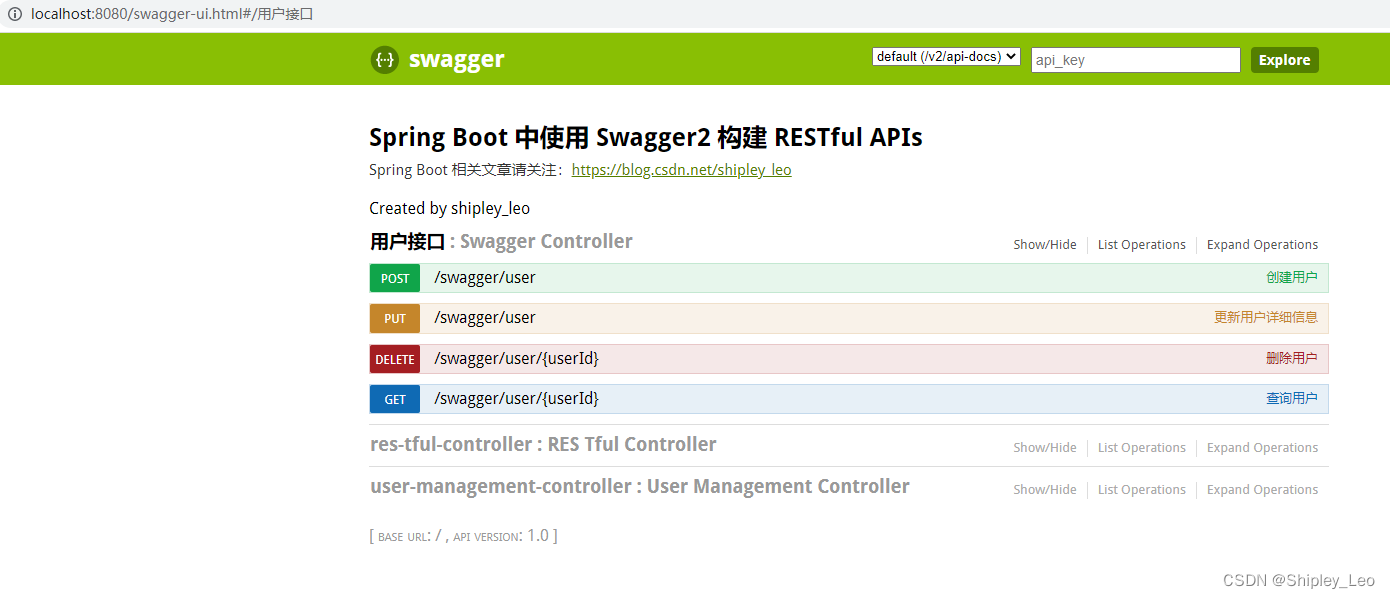
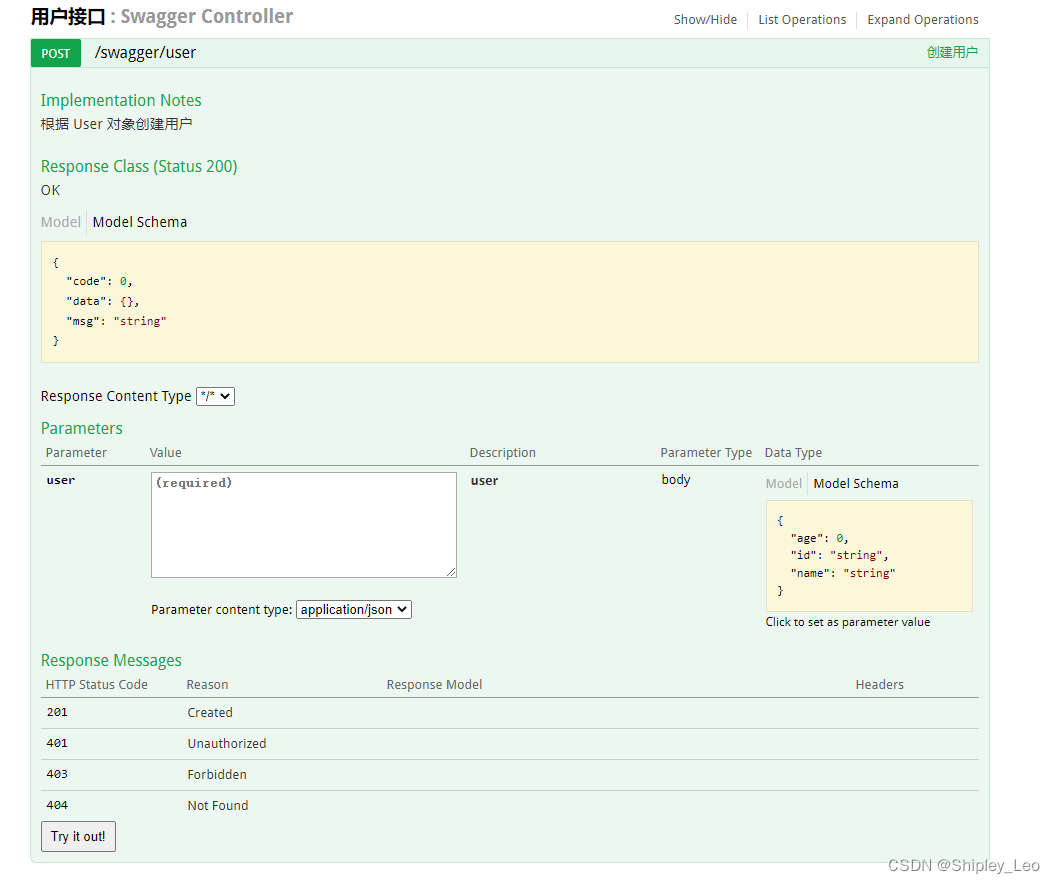
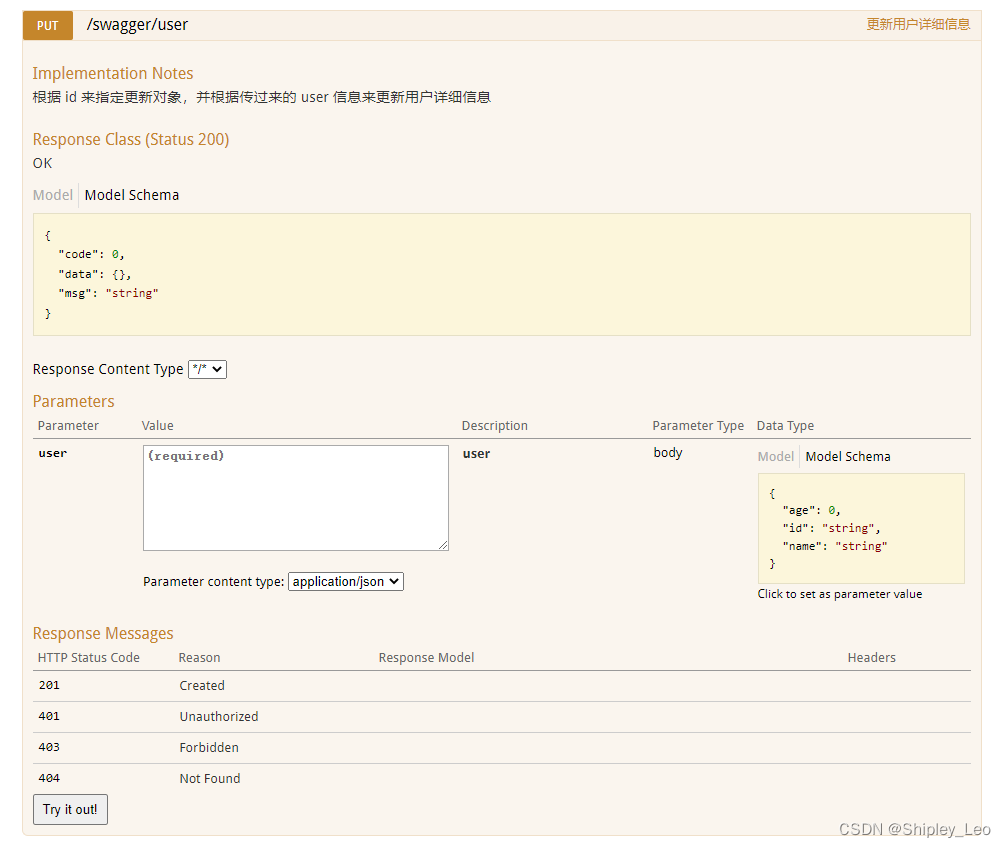
Swagger 自动将用户管理模块的全部接口信息展现出来,包括接口功能说明、调用方式、请求参数、返回数据结构等信息。
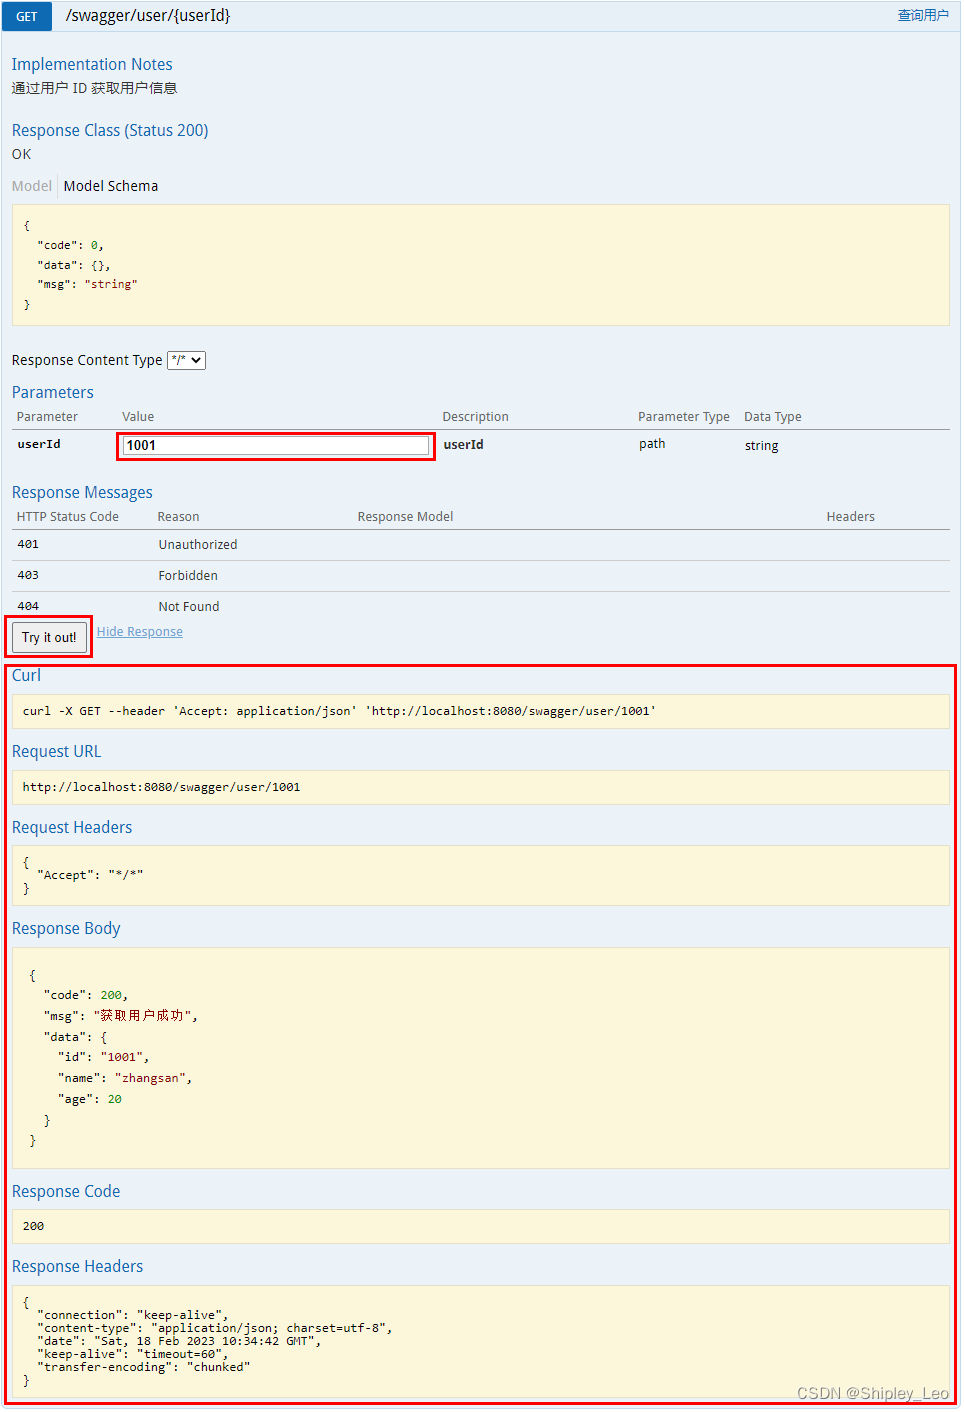
(2)Swagger 接口验证测试
在 Swagger 页面上,我们发现每个接口描述左下方都有一个按钮“Try it out!”,点击该按钮即可调用该接口进行测试。如图所示,输入userId请求参数“1001”,然后单击“Try it out!”按钮就会将请求发送到后台,从而进行接口验证测试。
调用接口进行测试:
答疑解惑
报错问题:Spring Boot 整合 Swagger 用于生成 Web API 文档的过程中,出现了一个报错“Failed to start bean ‘documentationPluginsBootstrapper’; nested exception is java.lang.NullPointerException”。
原因分析:这个报错是因为 springboot 升级到 2.6.0之后,swagger版本和springboot出现了不兼容情况。
解决方案:有三种解决方案可供参考使用,分别为:
- 方案一:在启动类 或 配置类 添加注解 @EnableWebMvc。
- 方案二:在 application.properties 配置文件添加配置: properties spring.mvc.pathmatch.matching-strategy=ant_path_matcher
- 方案三:降低Spring Boot 版本,比如可以考虑将Spring Boot版本降低为2.5.6。
更加详细的说明,可参考:Failed to start bean ‘documentationPluginsBootstrapper‘; nested exception is java.lang.NullPointerEx
6.3.3 为 Swagger 添加 token 参数
很多时候,客户端在调用 API 时需要在 HTTP 的请求头携带通用参数,比如权限验证的 token 参数等。但是 Swagger 是怎么描述此类参数的呢?接下来通过示例演示如何为 Swagger 添加固定的请求参数。
其实非常简单,修改 Swagger2Config 配置类,利用 ParameterBuilder 构成请求参数,具体示例代码如下:
package com.example.restfulproject.comm.config;import org.springframework.context.annotation.Bean;
import org.springframework.context.annotation.Configuration;
import org.springframework.web.servlet.config.annotation.ResourceHandlerRegistry;
import org.springframework.web.servlet.config.annotation.WebMvcConfigurer;
import springfox.documentation.builders.ApiInfoBuilder;
import springfox.documentation.builders.ParameterBuilder;
import springfox.documentation.builders.PathSelectors;
import springfox.documentation.builders.RequestHandlerSelectors;
import springfox.documentation.schema.ModelRef;
import springfox.documentation.service.ApiInfo;
import springfox.documentation.service.Parameter;
import springfox.documentation.spi.DocumentationType;
import springfox.documentation.spring.web.plugins.Docket;
import springfox.documentation.swagger2.annotations.EnableSwagger2;import java.util.ArrayList;
import java.util.List;/*** Swagger2 配置类*/
@Configuration
@EnableSwagger2
public class Swagger2Config implements WebMvcConfigurer {@Beanpublic Docket createRestApi() {List<Parameter> parameters = new ArrayList<Parameter>();ParameterBuilder parameterBuilder = new ParameterBuilder();parameterBuilder.name("token").description("token令牌").modelRef(new ModelRef("string")).parameterType("header").required(false).build();parameters.add(parameterBuilder.build());return new Docket(DocumentationType.SWAGGER_2).apiInfo(apiInfo()).select().apis(RequestHandlerSelectors.basePackage("com.example.restfulproject.controller")).paths(PathSelectors.any()).build().globalOperationParameters(parameters);}...
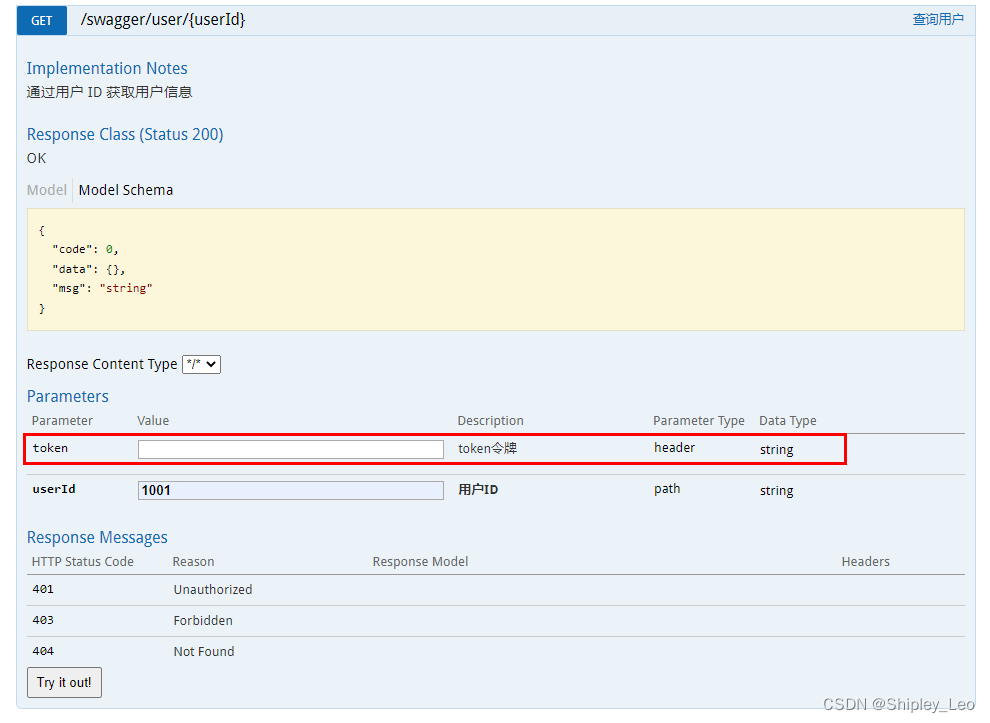
}在上面的示例中,通过 ParameterBuilder 类把 token 作为全局统一的参数添加到 HTTP 的请求头中。系统所有的 API 都会统一加上此参数。
完成之后重新启动应用,再次查看接口,如图所示,我们可以看到接口参数中已经支持发送 token 请求参数。
6.3.4 Swagger 常用注解
Swagger 提供了一系列注解来描述接口信息,包括接口说明、请求方法、请求参数、返回信息等,常用注解如表所示。
Swagger常用注解说明
| 注解 | 属性 | 取值类型 | 说明 | 示例 |
|---|---|---|---|---|
| @Api | value | 字符串 | 可用在class头上,class描述 | @Api(value="xxx", description="xxx") |
| description | 字符串 | |||
| @ApiOperation | value | 字符串 | 可用在方法头上,参数的描述容器 | @ApiOperation(value="xxx",notes="xxx") |
| notes | 字符串 | |||
| @ApiImplicitParams | value | @ApiImplicitParam数组 | 可用在方法头上,参数的描述容器 | @ApiImplicitParams({@ApiImplicitParam1,@ApiImplicitParam2,...}) |
| @ApiImplicitParam | name | 字符串,与参数命名对应 | 可用在@ApiImplicitParams中 | @ApiImplicitParam(name = "userId", value = "用户ID", required = true, dataType = "String", paramType = "path") |
| value | 字符串 | 参数中文描述 | ||
| required | 布尔值 | true/false | ||
| dataType | 字符串 | 参数类型 | ||
| paramType | 字符串 | 参数请求方式:query/path | ||
| defaultValue | 字符串 | 在API测试中的默认值 | ||
| @ApiResponses | value | @ApiResponse数组 | 可用在方法头上,参数的描述容器 | @ApiResponses({@ApiResponse1,@ApiResponse2,...}) |
| @ApiResponse | code | 整数 | 可用在@ApiResponses中 | @ApiResponse(code=200, message="Successful") |
| message | 字符串 | 错误描述 | ||
| @ApiIgnore | value | 字符串 | 忽略这个API | |
| @ApiError | 发生错误的返回信息 |
在实际项目中,Swagger 除了提供 @ApiImplicitParams 注解描述简单的参数之外,还提供了用于对象参数的 @ApiModel 和 @ApiModelProperty 两个注解,用于封装的对象作为传入参数或返回数据。
- @ApiModel 负责描述对象的信息
- @ApiModelProperty 负责描述对象中属性的相关内容
以上是在项目中常用的一些注解,利用这些注解就可以构建出清晰的 API 文档。
来源:《Spring Boot 从入门到实战》学习笔记